

































This guide covers creating, setting up and testing an ISP proxy: we create an ISP proxy with a static IP from scratch in the Proxynet panel, choose the usage type and the country, collect the connection details and send a first request to confirm that the IP works. The screenshots are taken from the panel's English interface, and the text uses the same button and tab names. The same steps are in the video below.
What do you need to set up an ISP proxy?
You need a Proxynet account and some balance on it. ISP proxies are billed differently from residential and mobile proxies: you do not pay for the GB you use, but per IP and per month. The current price for your account tier (starting at $1) is shown on the ISP Proxy page and on the Order Summary card of the order screen.
Answer three questions before you order: will the proxy be used on all websites or on a single target site, how many IPs do you need, and which country should the IPs come from. These three answers drive your choices on the Create Gate page. For how an ISP proxy differs from residential, see ISP vs Residential Proxies: Which One Should You Choose?; for when a static IP is useful, see Static IP vs Dynamic IP: Which One Do You Need?.
How do you create an ISP proxy in the panel?
Every proxy order in the panel is listed as a gate. In an ISP gate, each IP is a static address reserved for you: it does not change for the whole term and comes with its own port, username and password.
Step 1: Open the Proxy Create menu
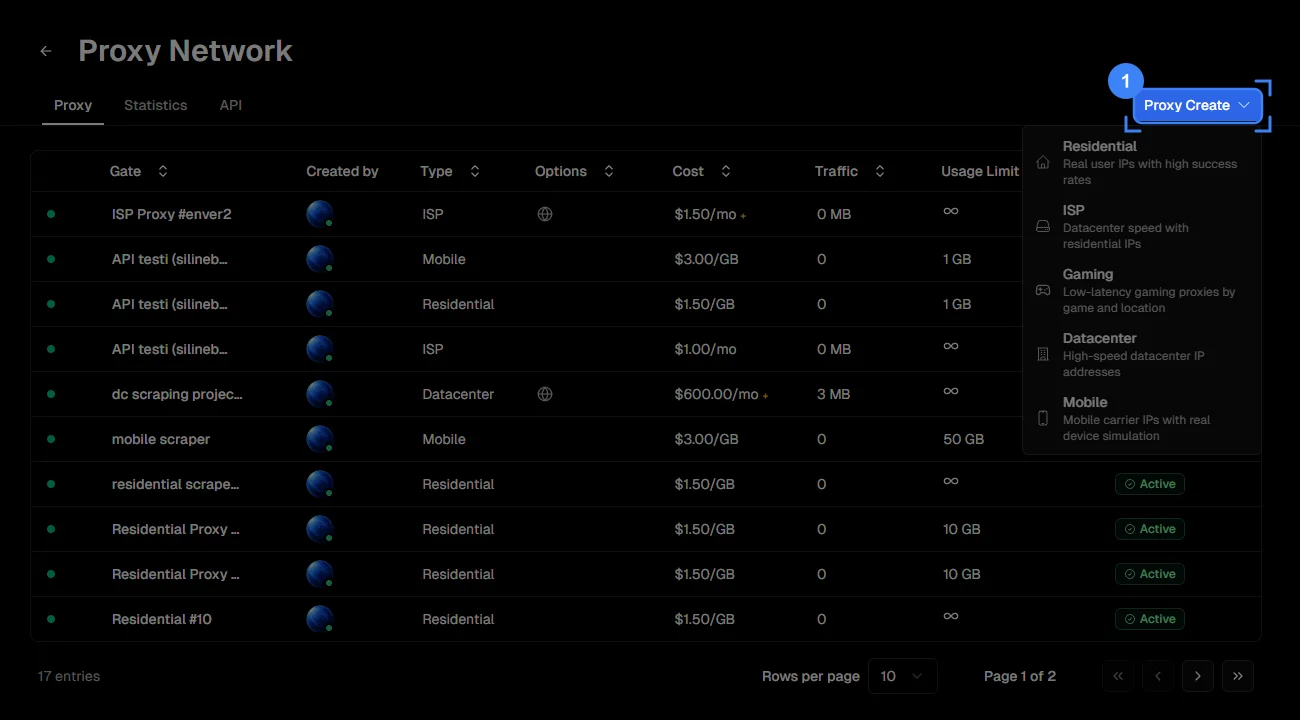
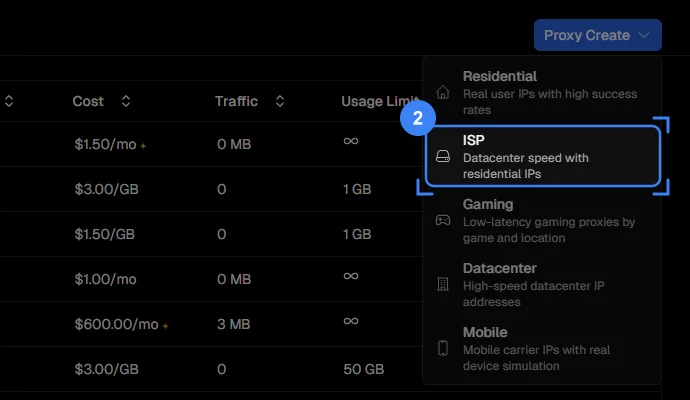
Switch to the Proxy tab. The list shows your existing gates with their name, type, cost, traffic used and status. Click the blue Proxy Create button in the top right.
Step 2: Choose the ISP type
The menu that opens lists five proxy types; click ISP, the second one. The description in the menu sums up the type: residential IPs registered to internet service providers that run at datacenter speed.
Step 3: Choose the usage type
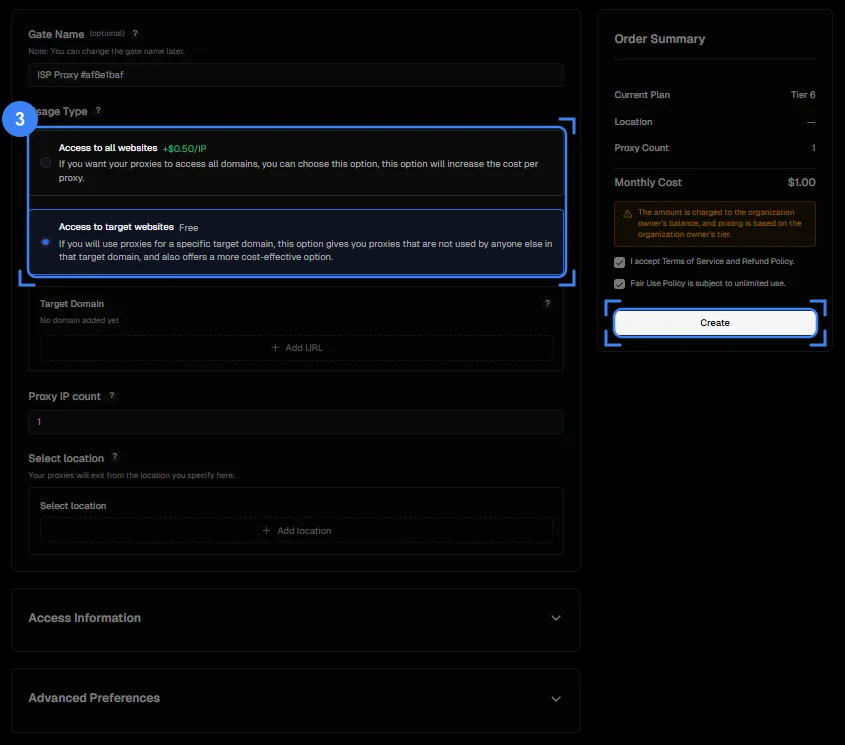
On the Create Gate page the ISP tab is already selected. If you like, enter a name that describes the job in the Gate Name field; you can rename it later as well. The most important decision on the page is in the Usage Type section:
- Access to all websites: the IPs are delivered without any domain restriction, so you can use the proxy on any site. This option is a paid add-on per IP.
- Access to target websites: the IPs only work on the target domain you specify. This option is free, and according to the panel's description, nobody else uses the IPs you get on that target site. If you need a proxy for a single site, this is the more economical route.
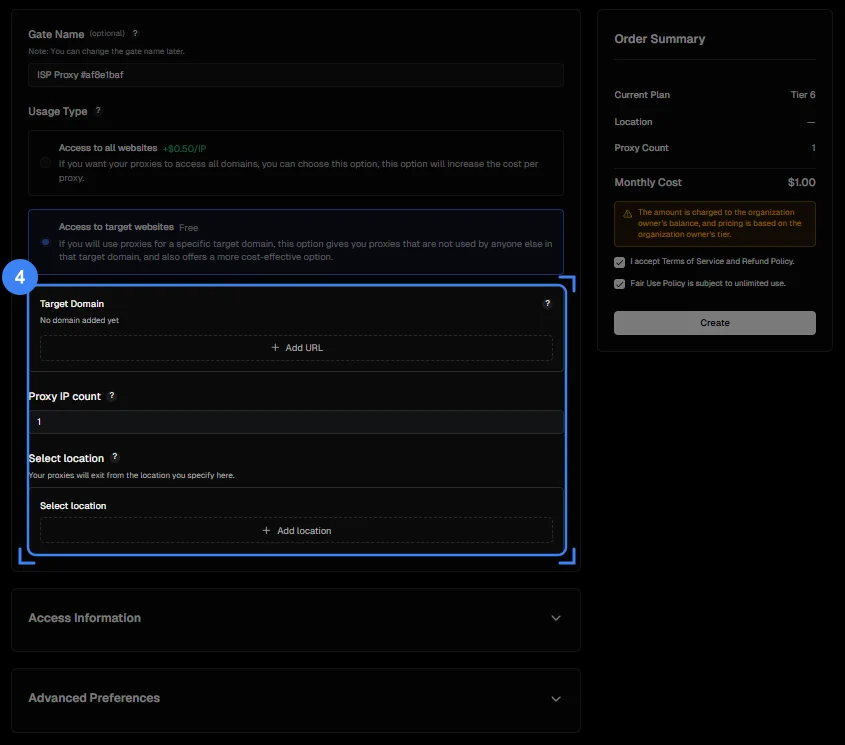
If you pick the target website option, add the domain with Add URL in the Target Domain field below. The Order Summary card on the right updates the monthly cost as soon as you change your selection.
Step 4: Set the number of IPs and the country
Enter how many IPs you want in the Proxy IP count field. Each IP is a separate static address; if you are going to keep five accounts apart, you take five IPs. The Add location button in the Select location section opens the country picker.
Step 5: Pick the country and create the gate
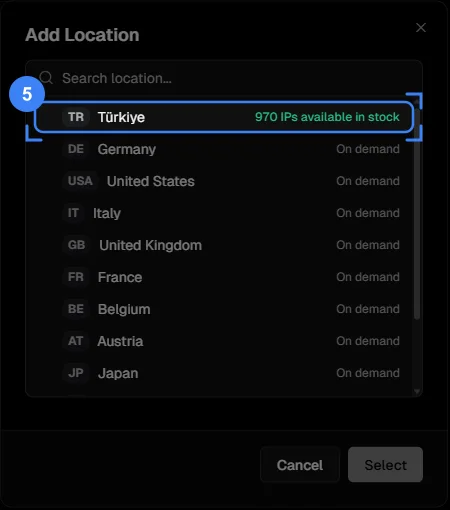
In the Add Location window, countries are listed with one of two statuses. In countries marked IPs available in stock, the IPs are ready and delivered the moment you order. In countries marked On demand, the IPs are allocated after you order. Pick the country and press Select.
There are two more collapsible sections at the bottom of the page. Access Information shows the username and password before the gate is created; you can enter your own values if you like. Advanced Preferences holds extra preferences; the defaults are enough for a first setup. Tick the two boxes on the Order Summary card, for the terms of use and the Fair Use Policy, and press Create. Note that if you were added to a workspace as a member, the charge comes out of the account owner's balance.
Where are the ISP gate's connection details?
As soon as you press Create, the gate's page opens. It has four tabs: Access Details, Proxy List, Statistics and Logs. The Endpoint Generator tab you know from residential and mobile gates is missing here, because an ISP IP is static: country and session were already chosen when you ordered.
Step 6: Check Access Details and the summary
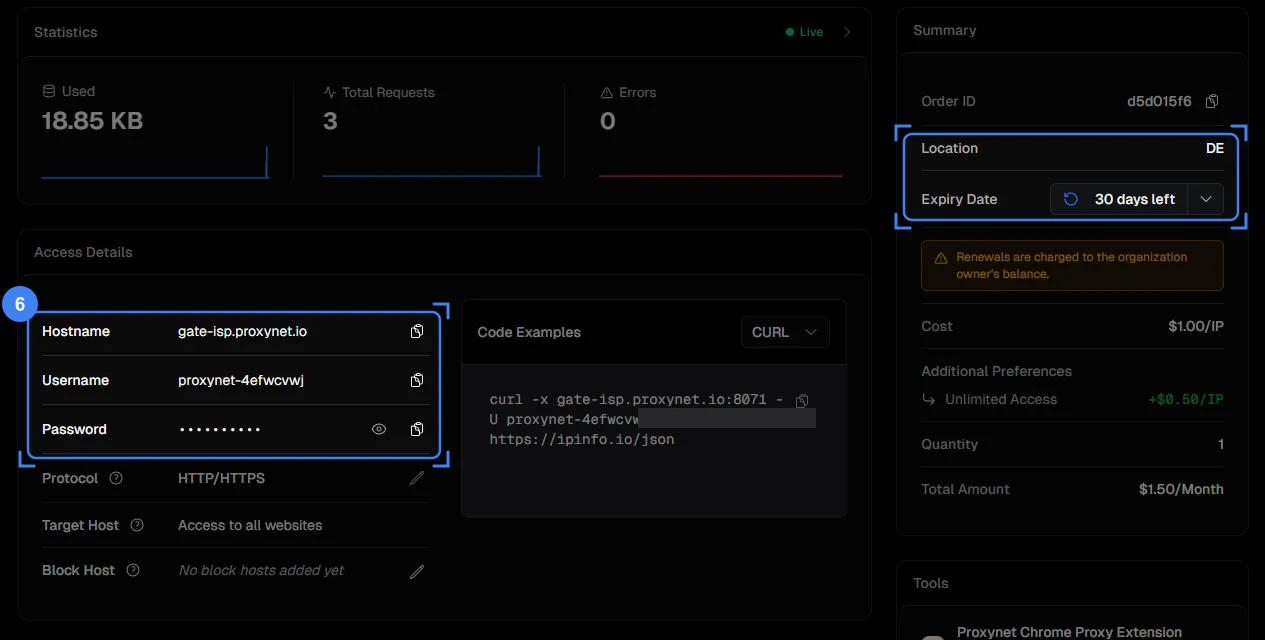
- Hostname: the address of the ISP gateway (
gate-isp.proxynet.io). Each IP has its own port, listed in the Proxy List tab. - Username / Password: the gate's credentials. The eye icon reveals the password, the copy icon puts it on the clipboard.
- Protocol: the connection protocol. You can change it with the pencil icon; HTTP/HTTPS is enough for browsers and most tools, and for programs that require SOCKS5, see the SOCKS5 Proxy page.
- Target Host: the usage type. "Access to all websites" means all sites; if you chose a target site, its domain appears here.
- Block Host: domains you do not want the proxy to open.
The Summary card on the right shows the order number, the country of the IPs (Location), the remaining term (Expiry Date), the price per IP and any extra preferences. The Code Examples card gives you curl and other language commands already filled in with the gate's details.
Step 7: Set the term and auto renewal
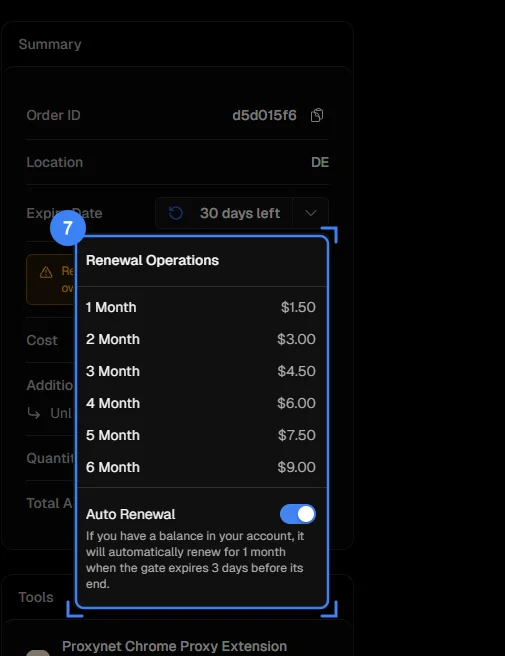
An ISP gate runs monthly. The arrow on the Expiry Date row opens the Renewal Operations menu, where you can extend the gate by hand for one to six months. If the Auto Renewal switch at the bottom of the menu is on and the account has balance, the gate is extended by one month three days before it expires. For jobs where the account, or the IP itself, must not change (a social media account, an API allowlist), keeping this switch on prevents you from losing the IP.
Step 8: Get the IP row from Proxy List
The Proxy List tab shows each IP you bought on its own row: gateway, port, username, password, country flag, exit IP (Exit IP) and your own note. If you bought several IPs, each one has a different port; you can keep track of which account is tied to which IP by writing it in the Note column. The download button in the top right gives you the whole list as a file, and the search box filters by IP or note.
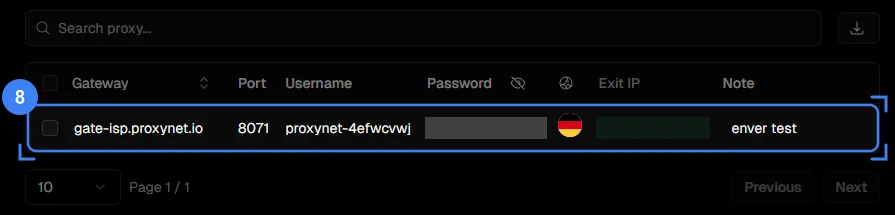
When you enter the row in your program, the format is gate-isp.proxynet.io:PORT:user:pass. Take the port from this list, not from the Hostname row; entering the wrong port is the most common setup mistake with ISP proxies.
How do you test an ISP proxy?
Testing means opening an IP check page through the proxy and looking at the address it returns. With an ISP proxy there are two things to check: is the returned IP the same as the Exit IP in Proxy List, and does it stay the same no matter how many times you run the command.
Step 9: Send the first request
In the browser: install the Proxynet Chrome extension from the Tools card, enter the row from Proxy List and open https://ipinfo.io/json. Instead of the extension you can also use the operating system's proxy setting; the steps are in Is My Proxy Working? How to Test a Proxy.
In the terminal: copy the curl command from the Code Examples card and paste it into a terminal.
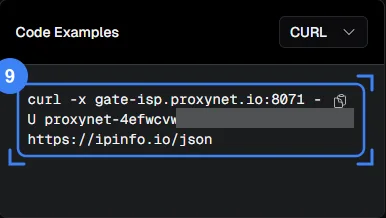
The general form of the command (the port, username and password are replaced with yours):
curl -x gate-isp.proxynet.io:8071 -U user:pass https://ipinfo.io/json-x sets the proxy address and port, and -U sets the proxy credentials (curl documentation). On an ISP gate with Germany selected, a successful test returns a response like this (we generalized the IP address and the provider):
{
  "ip": "xxx.xxx.xxx.xxx",
  "city": "Frankfurt am Main",
  "region": "Hesse",
  "country": "DE",
  "org": "ASxxxx Example ISP GmbH"
}
Three things to check: is ip the same as the Exit IP in Proxy List, is country the country you ordered, and does the IP stay the same when you run the command several times. With an ISP proxy the IP is not expected to change; if it does, the request is going out through another gate. If you get 407 instead of a response, the credentials were not accepted; the code is defined in RFC 9110. If the command gets no response at all, see What Is a Proxy Error? Fix Proxy Server Not Responding; for further experiments with curl there is cURL with Proxy: How to Set HTTP and SOCKS5 Proxies.
Step 10: See usage in Statistics
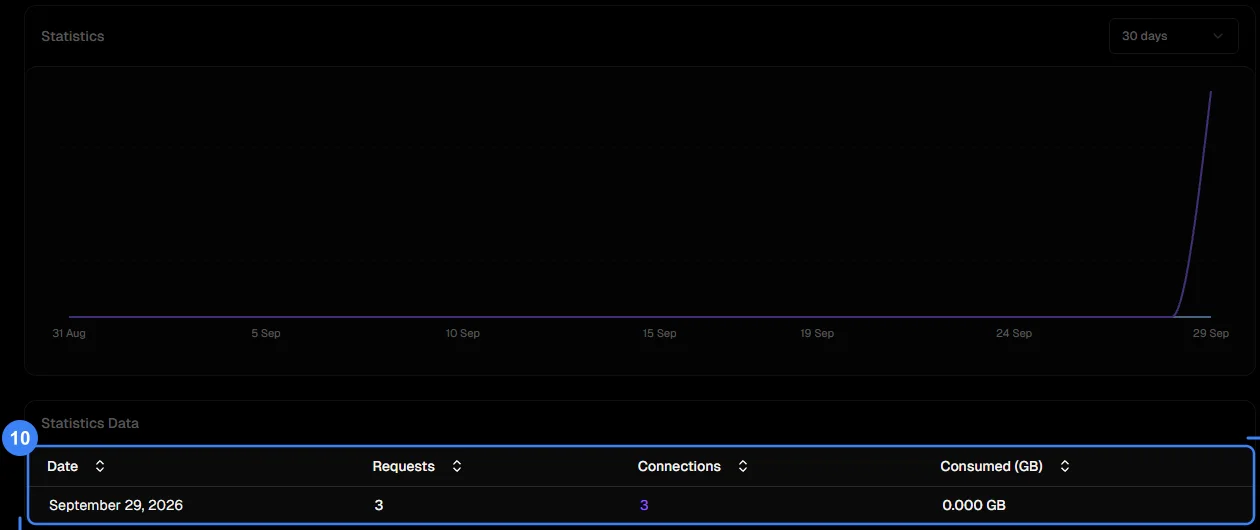
The Statistics tab shows a chart for the selected period and, below it, each day's requests, connections and traffic used. After the test request, a few requests appear on that day's row. Because ISP proxies are not billed by traffic, this table is less about budget and more about usage: it tells you whether an IP is actually doing work and how much load it carried on which day.
Step 11: Review requests in Logs
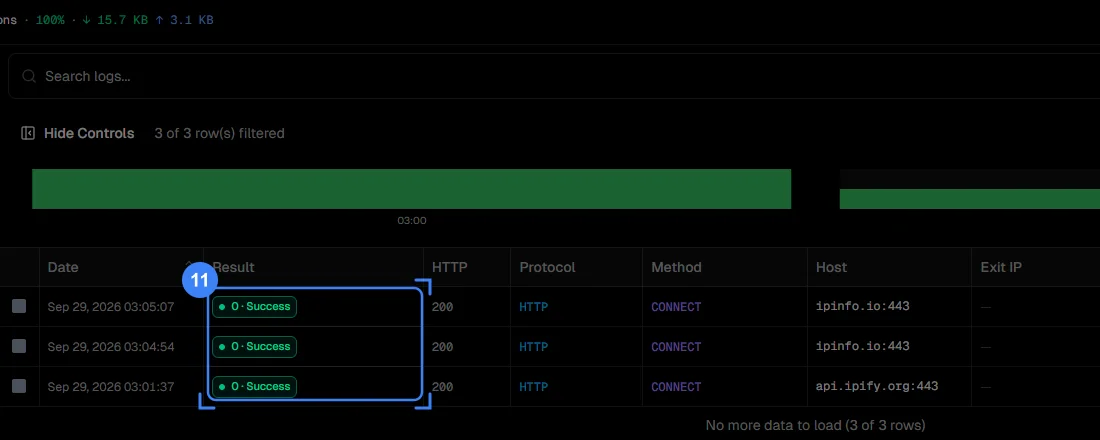
Each connection is one row: date, result, HTTP code, protocol, method, domain, latency (Latency), traffic and duration. The summary line at the top gives the number of connections, the success rate and the total traffic for the selected period; you can switch between 1 hour, 24 hours, 7 days and 30 days in the top right. When a proxy "doesn't work", this is the first place to look: no row means the request never reached the gate, a failed result means the code on the row tells you why, and a successful row means the problem is on the target site. If you tried an IP bought with the target website option on another domain, you will see that here too.
That completes the setup. The sections below cover the usage type decision, when ISP is the right choice and the errors that come up in the first hour.
Should you choose all websites or a target website?
The Usage Type decision shows its effect later: an IP bought for a target site does not work on another site. The table below puts the two options side by side.
| Criterion | Access to all websites | Access to target websites |
|---|---|---|
| Which sites does it work on? | All sites | Only the target domain you added |
| Price | Paid add-on per IP | No extra charge |
| The IP's history on that site | Other users may have used it on that site | The panel states that nobody else uses the IP on that target site |
| Suitable jobs | Managing accounts on several platforms, general browsing, testing on different sites | Accounts dedicated to a single store, marketplace or social network |
| Changing your mind later | Not needed | A new order when you need another site |
If you are buying a proxy for a single platform, the target website option is both economical and keeps the IP clean on that platform. If you know you will visit different sites with the same IP, take the all websites option from the start.
Should you use an ISP or a residential proxy?
Both types use the same panel and similar steps; the difference lies in how long the IP lives and in how it is billed. With ISP the IP is static and stays yours as long as you keep renewing; you pay per IP and per month. With residential, each request or each session gets an IP from the pool; you pay per GB, and country, city and session length are chosen in the Endpoint Generator.
Choose ISP for these jobs: accounts that need to stay on the same IP for days or weeks, an address that goes on the IP allowlist of an API or an admin panel, and long sessions where speed and stability matter. For jobs that need frequent IP changes or read data from many countries, residential is the better fit; we cover its setup in Create and Set Up a Residential Proxy: Step-by-Step Guide. For jobs that need a mobile carrier IP, see Create and Set Up a Mobile Proxy: Step-by-Step Guide. How a static IP is used for API access is explained in Static IP for API Access: Fix IP Authorization Errors.
How do you fix common setup errors?
| Symptom | Seen in Logs | Cause | Fix |
|---|---|---|---|
407 Proxy Authentication Required | Failed result | The username or password was copied incorrectly | Copy the row again from Proxy List; reveal the password with the eye icon and compare |
| Connection times out | No row | Wrong port, or your network blocks that port | Take the port from Proxy List. On a corporate network, try another network |
| The proxy works on one site but not on another | Failed result, different domain | The gate was bought with the target website option | Check the Target Host row. For other sites, open a new gate with the all websites option |
| The returned IP is not the Exit IP from Proxy List | No row, or on another gate | The program uses a different proxy setting, or the proxy is not active | Check that the address in the program is gate-isp.proxynet.io and that the port is correct |
| The returned country is not the one you expected | Successful result | IP location databases sometimes show a different city or country | Check with several IP location services; if the problem persists, contact support |
| The gate expired and the proxy stopped | No row | The term ended, auto renewal was off or the balance was too low | Extend it from Renewal Operations; turn on Auto Renewal and check the balance |
| The browser does not ask for a username and password | No row | The browser's own proxy setting does not support password-protected proxies | Use the Chrome extension |
| A program that requires SOCKS5 does not connect | No row | The gate's protocol is HTTP/HTTPS | Change the Protocol row in Access Details with the pencil icon |
If none of the rows fit, check which domain the last row in Logs points to and try opening the same address without the proxy; if the page does not load without the proxy either, the problem is not the proxy. The authentication options are covered in detail in Proxy Authentication: User:Pass vs IP Whitelist.
Decision guide
| Need | Recommendation |
|---|---|
| Create your first ISP gate in the panel | Proxy > Proxy Create > ISP > Usage Type, IP count, country > Create |
| Use the proxy on a single site | Access to target websites, add the domain under Target Domain |
| Work on several sites with the same IP | Access to all websites |
| Immediate delivery | A country with IPs in stock in Add Location |
| Keep several accounts on separate IPs | Set Proxy IP count to the number of accounts, write the account in the Note column |
| Keep the IP | Auto Renewal on, balance on the account |
| Test without writing code | Chrome extension + ipinfo.io/json |
| Test from the terminal | The curl command in the Code Examples card, port from Proxy List |
| A different IP on every request | Residential Proxy |
| Diagnose "it doesn't work" | Logs tab |
Frequently asked questions
Is there a traffic limit on an ISP proxy?
ISP proxies are billed per IP and per month, not per GB; the traffic you use is not charged separately. The Fair Use Policy you accept on the order screen sets the framework for unlimited use. The Statistics tab still shows each day's usage.
Can I use an IP bought with the target website option on another site?
No. IPs bought with the Access to target websites option only work on the domain you added; a request sent to another site fails. For different sites you need a gate with the Access to all websites option.
What does "On demand" next to a country mean?
In the Add Location window, IPs in countries marked "IPs available in stock" are ready and delivered the moment you order. In countries marked "On demand", the IPs are allocated after you order. For an urgent job it is safer to pick a country with IPs in stock; if you need a specific country, you can ask the support team about the delivery time.
Does the IP of my ISP proxy change?
It does not change for the gate's term; that is what sets an ISP proxy apart from residential. If the term ends and the gate is not renewed, you lose the IP. That is why you should keep Auto Renewal on for jobs tied to the same IP.
I bought several IPs. Which one goes where?
Each IP sits on its own row in Proxy List and comes with its own port. Enter a different row in each program or account, and write in the Note column where you use that IP. You can also get the list as a file with the download button. The rules for managing several accounts are in How to Manage Multiple Social Media Accounts Safely.
I was added to a workspace as a member. Can I create a gate?
Yes, but as the warning on the order screen says, the charge and renewals come out of the workspace owner's balance and the price is set by their tier. The Created by column in the list shows who opened each gate.
Summary
Creating an ISP proxy comes down to a few decisions in the panel: choose ISP from the Proxy Create menu, decide between all websites and a single target site under Usage Type, set the number of IPs and the country, and press Create. The connection details are in Access Details, and each IP's port and exit address are in Proxy List. To test, use the curl command or the Chrome extension and check that the returned IP stays the same as the Exit IP; keep Auto Renewal on so you do not lose the IP. If you do not have a gate yet, you can start from the /proxy page.