

































When you buy a proxy, you get an address and a port. If the proxy forwarded traffic for everyone who connected to that address, other people would be using it. That is why every paid proxy checks who is connecting before it accepts the connection. There are two common ways to do this: a username and password (user:pass) or a list of allowed IP addresses (IP whitelist).
In this article we explain how both methods work behind the scenes, which one is more secure and practical in which situation, and how to connect with each method in cURL, Python and the browser. We also look at the causes of the 407 Proxy Authentication Required error, which accounts for a large share of support tickets, and at the problem a dynamic IP address creates for whitelisting.
What is proxy authentication?
Proxy authentication is the proxy server checking whether a connection belongs to an authorised user before forwarding it. If authentication fails, the proxy does not forward the request to the target.
The two methods answer different questions:
- Username and password: "Does the sender of this request know the right credentials?"
- IP whitelist: "Is this connection coming from an allowed IP address?"
In the first method the credential is inside the request; in the second, the source of the connection acts as the identity. That difference shapes the portability, security and failure modes of the two methods. We explain how a proxy works in general in What Is a Proxy Server and How Does It Work?.
How does a username and password connection work?
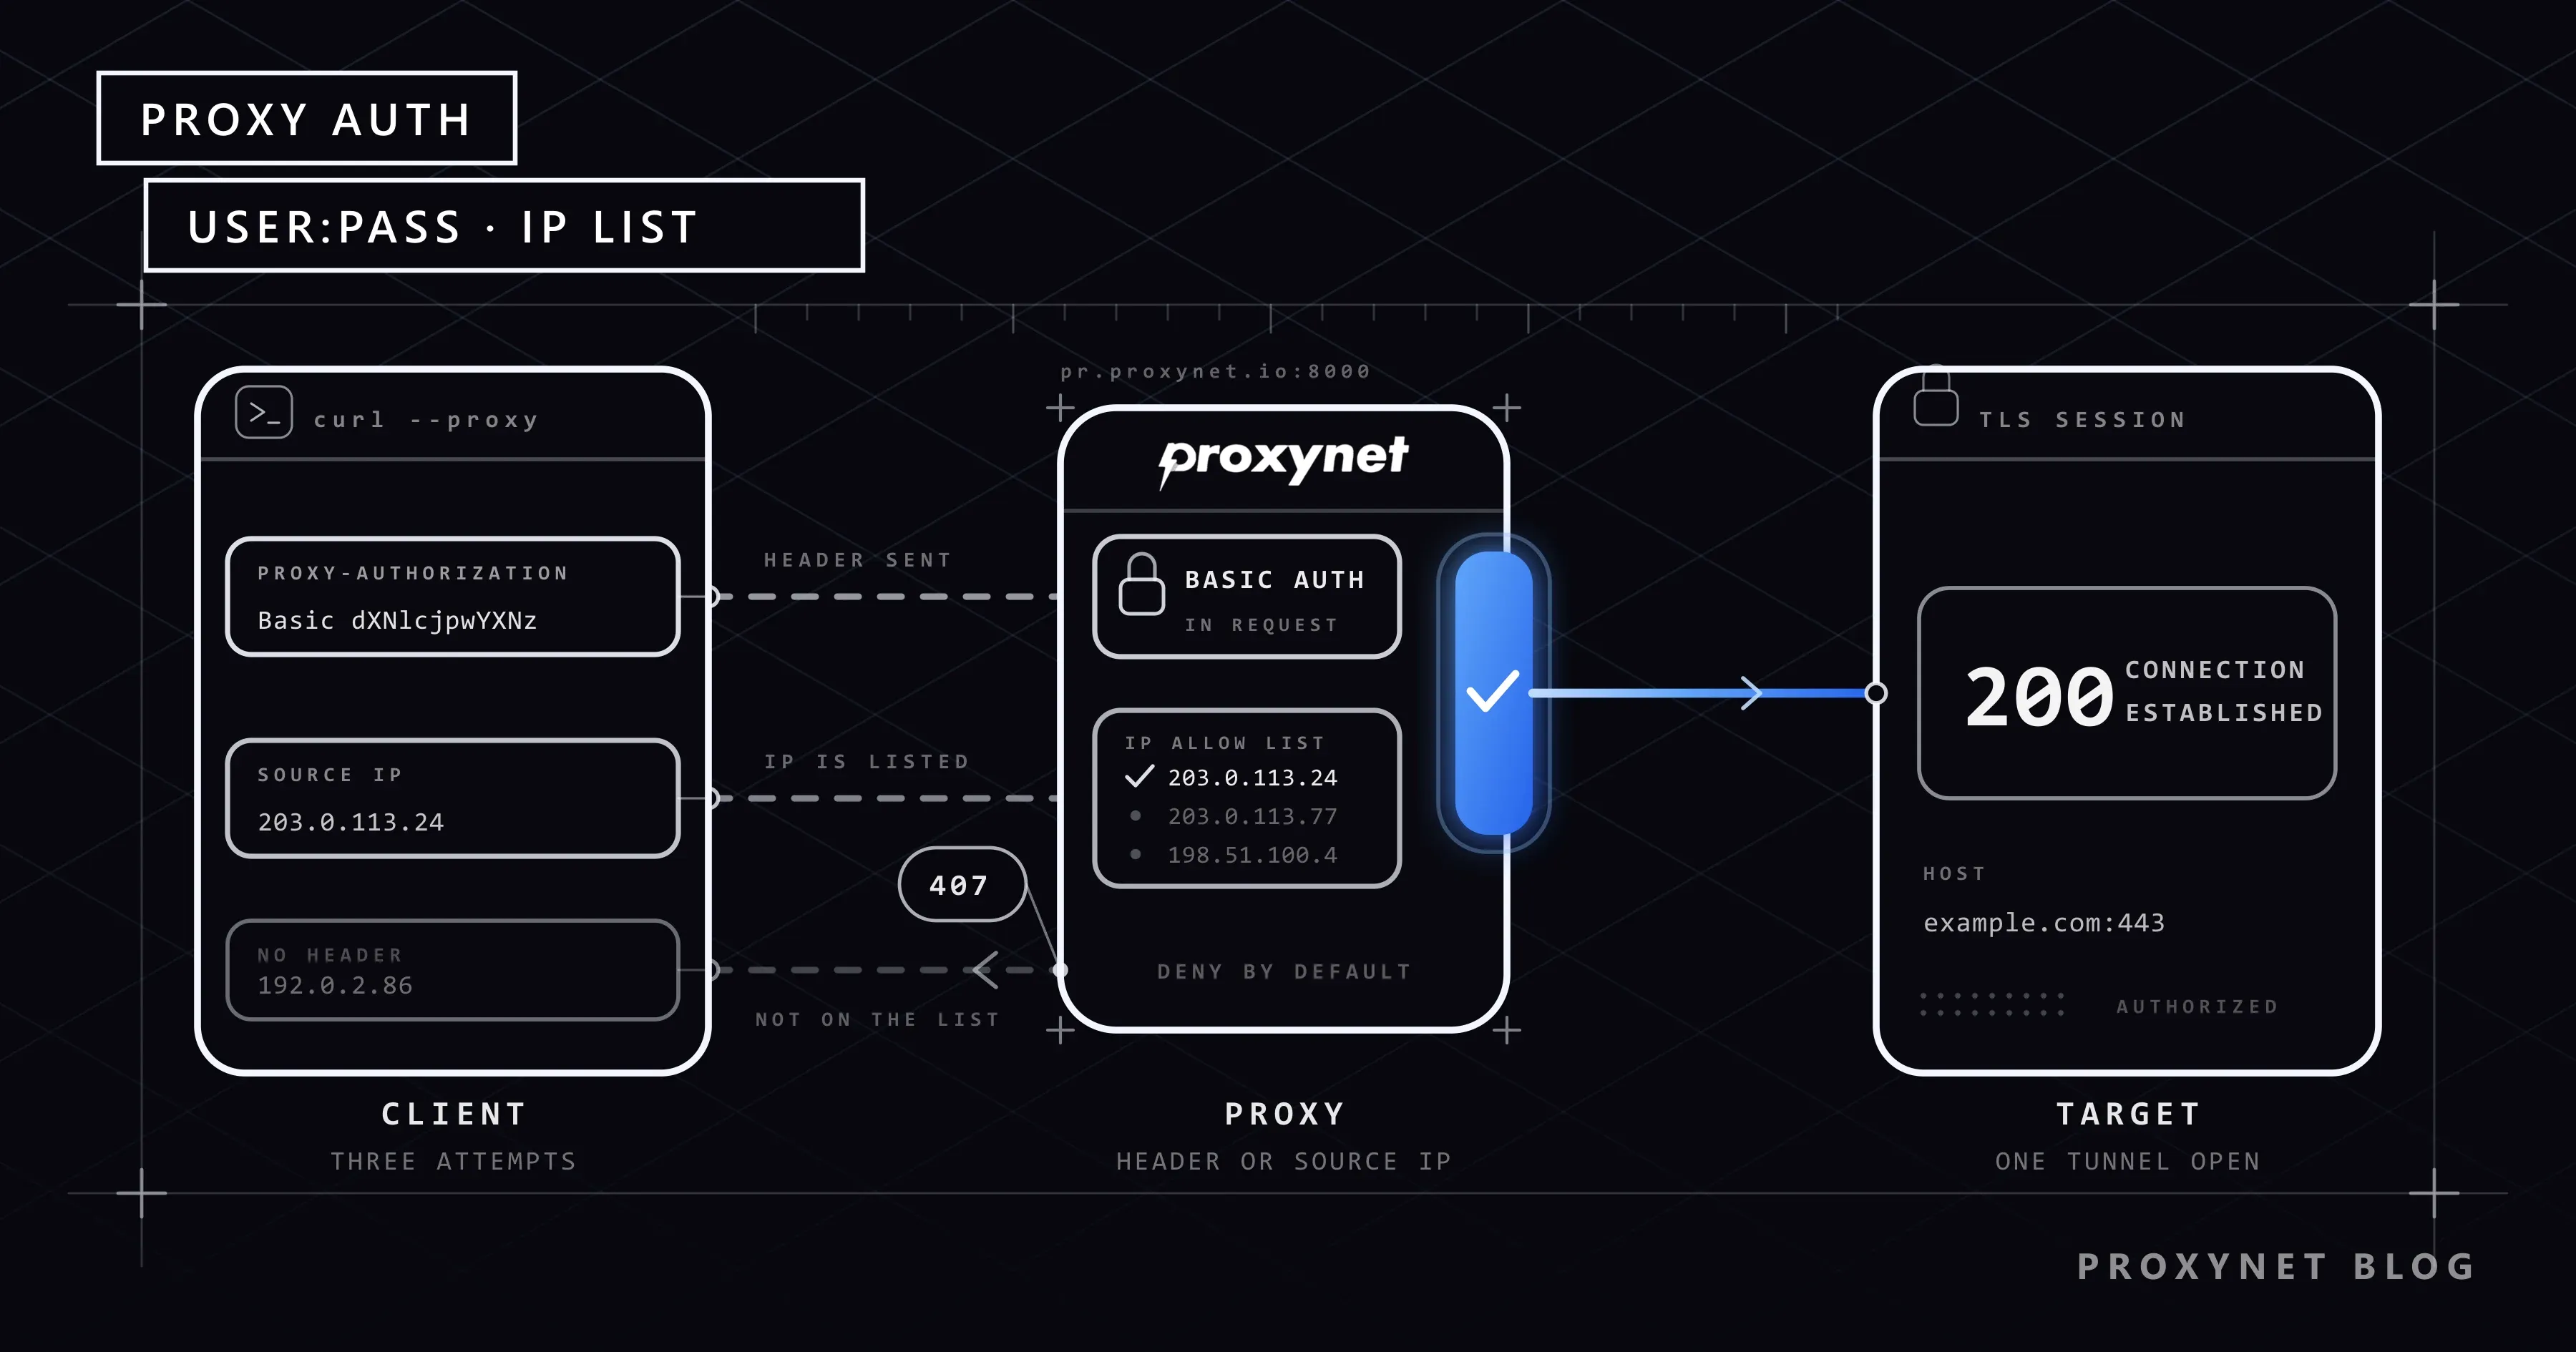
For HTTP proxies, username and password authentication is part of the HTTP standard. RFC 9110 defines the Proxy-Authenticate header, which the proxy uses to request credentials, and the Proxy-Authorization header, which the client uses to send them. The most common scheme is Basic, defined in RFC 7617.
For an HTTPS request, the process goes like this:
- The client connects to the proxy and sends a
CONNECT target.com:443request. - If the request carries no credentials, the proxy responds with
407 Proxy Authentication Requiredand aProxy-Authenticate: Basic realm="proxy"header. - The client joins the username and password as
user:pass, encodes them in Base64 and sends the request again with the headerProxy-Authorization: Basic dXNlcjpwYXNz. - The proxy checks the credentials. If they are right, it connects to the target and returns
200 Connection Established; if not, it returns 407 again.
Most clients add the header on the first attempt, so step 2 is skipped in practice. Browsers try without the header first and show a login dialog when they receive a 407.
There is an important detail here: Base64 is encoding, not encryption. Anyone who sees the header can decode it in seconds and read the username and password. In most setups the connection between the client and the proxy is unencrypted HTTP, which means the credentials travel in effectively plain text over that short leg. The HTTPS tunnel established with the target site does not protect this header, because the header is sent before the tunnel exists.
SOCKS5 proxies have a similar username and password sub-negotiation defined in RFC 1929; there too, credentials are sent unencrypted.
How does an IP whitelist work?
With an IP whitelist, the request contains no credentials at all. You register one or more IP addresses as authorised in the customer panel, and the proxy server compares each incoming connection's source IP with that list.
- In the panel, you add the public IP address of the machine that will use the proxy.
- The client connects to the proxy without a username or password.
- The proxy looks at the connection's source address. If it is on the list, the request is forwarded.
- If the address is not on the list, the connection is refused or gets a 407.
The "public IP address" here is not the local address like 192.168.x.x that you see in your computer's network settings. The address the proxy sees is the one your modem or server uses on the internet. To find it, run this command with the proxy off:
curl https://api.ipify.orgThe biggest advantage of a whitelist is that it works with software that does not support credentials. Some older desktop applications, game clients and automation tools only offer address and port fields in their proxy settings; in that case a whitelist is the only option.
Comparing the two methods
| Criterion | Username and password | IP whitelist |
|---|---|---|
| How is identity proven? | Proxy-Authorization header in the request | Source IP address of the connection |
| Connecting from different networks | No problem | Each network's IP must be added |
| Home connection with a dynamic IP | No problem | The connection breaks when the IP changes |
| Multiple devices | All connect with the same credentials | Each device's exit IP must be added |
| Risk of unauthorised use | If credentials leak, usable from anywhere | Other users sharing the same IP |
| Software without credential support | Does not work | Works |
| Secrets in code and configuration | Yes, they must be stored securely | None |
| Chrome with SOCKS5 | Not supported | Works |
| Typical use | Laptops, different networks, cloud functions | Servers with fixed IPs, legacy software |
Which is more secure?
There is no single answer; the two methods are exposed to different risks.
The risk with a username and password is leakage. A configuration file pushed to a code repository by mistake, a command visible during a screen share, or a saved login in a shared computer's browser is enough. Leaked credentials can be used from anywhere in the world, and that usage is billed to your account.
The risk with an IP whitelist is a shared IP address. Mobile operators and some home internet providers put many subscribers behind the same public IP address using a technique called CGNAT. When you add such an address to the list, unknown users sharing that address can also connect to your proxy. The same applies to café, hotel and coworking networks.
Practical rules:
- If you work from a server with a fixed IP, a whitelist is more secure; you do not carry secrets in your code.
- Do not use a whitelist from a mobile line or a home connection behind CGNAT.
- If you use a username and password, do not hard-code them; keep them in an environment variable or a secrets manager.
- If your panel lets you create separate sub-users for different jobs, use that; a leaked credential then only affects one job.
Both methods with examples
The addresses and ports in the examples below are placeholders; take your own values from your customer panel.
cURL
# Username and password inside the address
curl -x "http://user:pass@pr.proxynet.io:8000" https://httpbin.org/ip

# Username and password as a separate option
curl -x "http://pr.proxynet.io:8000" -U "user:pass" https://httpbin.org/ip

# IP whitelist: no credentials
curl -x "http://pr.proxynet.io:8000" https://httpbin.org/ip
The -U option (long form --proxy-user) also reduces special-character problems, because the password is not written inside the address. For other cURL options, see How to Use a Proxy with cURL.
Python Requests
import os
from urllib.parse import quote

import requests

user = os.environ["PROXY_USER"]
password = quote(os.environ["PROXY_PASS"], safe="")  # encodes characters such as @, : and /

# Username and password
proxy = f"http://{user}:{password}@pr.proxynet.io:8000"
r = requests.get("https://httpbin.org/ip", proxies={"http": proxy, "https": proxy}, timeout=20)
print(r.json())

# IP whitelist
proxy = "http://pr.proxynet.io:8000"
r = requests.get("https://httpbin.org/ip", proxies={"http": proxy, "https": proxy}, timeout=20)
print(r.json())
Because the credentials are read from environment variables, the password is not visible even if the code file is shared. We walk through a rotating Python setup in How to Rotate Proxies in Python. For the Node.js equivalent, see Using a Proxy in Node.js.
Browser
Browsers take the proxy address from their settings or from the operating system, but they do not ask for a username and password on the settings screen. When the proxy returns a 407 on the first request, a login dialog opens and you enter the credentials there. Chrome does not support username and password authentication for SOCKS5 proxies; if you want to use SOCKS5 with Chrome, you need an IP whitelist.
The steps for Windows and Chrome are in Windows and Chrome Proxy Settings, and for Firefox in Firefox Proxy Settings. For setup in the API testing tool, see Postman Proxy Settings. The option to route desktop applications that have no proxy settings is covered in Proxifier.
Why does the 407 Proxy Authentication Required error appear?
Section 15.5.8 of RFC 9110 defines 407 as "the client needs to authenticate itself to use the proxy." So the problem is between you and the proxy, not at the target site. The most common causes are:
- The username or password is wrong. A trailing space or a case difference introduced while copying is enough.
- The password contains an unencoded special character. In
http://user:p@ss@pr.proxynet.io:8000, the client treats everything after the first@as the server name.@must be written as%40,:as%3Aand/as%2F. - The IP on the whitelist differs from the IP the connection comes from. The modem restarted, a VPN is still on, or you are connecting from a different network at work.
- The software does not send the credentials. Some tools ignore the
user:pass@part of the proxy address and need a separate credentials field or option. - Wrong protocol or port. Even with correct credentials, connecting to the HTTP port with SOCKS5, or the other way round, produces a confusing error.
- The account or sub-user is suspended. The balance may have run out, the sub-user may have been deleted or the traffic quota may be used up.
cURL's verbose output helps diagnose the error:
curl -v -x "http://user:pass@pr.proxynet.io:8000" https://httpbin.org/ip 2>&1 | grep -iE "proxy-authorization|< HTTP"If there is no Proxy-Authorization line in the output at all, the client is not sending the credentials. If the line is there but the response is 407, the credentials are wrong or there is a problem with the account. We collect the meaning of HTTP error codes in scraping in HTTP Status Codes in Web Scraping. In Python this response arrives as Tunnel connection failed: 407; we cover the other forms of the same message, such as 403 and a refused connection, in Max Retries Exceeded With URL.
What happens to a whitelist with a dynamic IP?
On most home internet connections the public IP address is not fixed. When the modem restarts, the line drops or the provider changes addresses at intervals, you get a new IP. The old address on the whitelist becomes invalid and the proxy refuses the connection.
Your options are:
- Switch to username and password. The least effort for connections with dynamic IPs.
- Get a static IP from your provider. A permanent fix if your work always runs from the same network.
- Move the job to a server with a fixed IP. Cloud servers usually have a fixed exit address, which suits scraping scripts and scheduled tasks.
- Update the list automatically if the panel has an API. This depends on the provider offering such an API.
Cloud functions and auto-scaling containers can get a different exit address every time they run; a whitelist usually cannot be used in these environments.
Use cases
- Scraping script on a server with a fixed IP: Whitelist, so there is no password in the code. A Rotating Proxy is used for different exit IPs through a single address.
- A team working from different networks: Username and password; even better if each member can get a separate sub-user.
- Account work that needs a session: Usually username and password; a Sticky Proxy for the same IP during the session, a ISP Proxy for a long-lived fixed address.
- Legacy desktop software with no credentials field: A whitelist is the only option.
- Chrome with SOCKS5: Whitelist, because Chrome does not support password authentication for SOCKS5.
Decision guide
| Your situation | Recommendation |
|---|---|
| Server or VPS with a fixed IP | IP whitelist |
| Laptop, different networks | Username and password |
| Home connection with a dynamic IP | Username and password |
| Mobile line or behind CGNAT | Username and password |
| Cloud function, auto-scaling container | Username and password |
| Software without a credentials field | IP whitelist |
| Chrome with SOCKS5 | IP whitelist |
| You don't want secrets in your code | IP whitelist (if you have a fixed IP) |
Frequently asked questions
Can I use both methods at the same time?
It depends on the provider. Many providers accept passwordless connections from whitelisted IPs and username-and-password connections from elsewhere on the same account. The panel settings decide this behaviour.
Are my username and password sent to the target site along with my traffic?
No. The Proxy-Authorization header is meant for the proxy only; the proxy does not pass it on to the target. The target site does not see your credentials.
How do I store my proxy password more securely?
Do not write the password in source code. Use an environment variable, a .env file kept out of version control, or your platform's secrets manager. If you suspect the password has leaked, change it in the panel right away.
How many IPs can I add to the whitelist?
The limit varies by provider and plan. You can find the current limit in your customer panel or from the support team.
Why do I get a 407 even though my password is correct?
The most common reason is unencoded special characters in the password. The second most common is that your software does not send the credentials in the address. Use the curl -v command above to check whether the header is being sent.
Does the whitelist work while a VPN is on?
With a VPN on, you go out to the internet with the VPN server's IP address. If your home or office IP is on the whitelist, the proxy refuses the connection. Either turn the VPN off or add the VPN's exit address to the list; the latter is not recommended, because other users may share that VPN address.
Summary
There are two ways to authenticate to a proxy: a username and password sent with every request in the Proxy-Authorization header, or an IP whitelist that looks at the connection's source address. Username and password works on any network but the credentials must be stored carefully; a whitelist leaves no secrets in code but needs a fixed, unshared IP address. A 407 error almost always comes from wrong credentials, an unencoded special character or an old IP on the whitelist. For plans that support both methods, take a look at our proxy services.