

































In this guide we create a residential proxy from scratch in the Proxynet panel, collect its connection details and send a first request to confirm it works. The video below walks through the same steps.
Before you start
You need a Proxynet account and some balance on it. Residential proxies are not billed as a monthly package but per GB of traffic you actually use; a small amount of balance is enough to create the gate. The current per-GB price is shown on the Residential Proxy page and on the order screen.
There are three things to decide: the target country, the session type (a new IP on every request, or the same IP for a while) and the program that will use the proxy. These three drive your choices in the Endpoint Generator. For what a residential proxy is, see What are Residential Proxies, How it Works?; for estimating how many GB you need, see What to Look for When Buying a Proxy: 10 Questions.
How do you create a residential proxy in the panel?
Every proxy order in the panel is listed as a gate. A residential gate opens the whole pool through a single address; country and session choices are made later, inside the username.
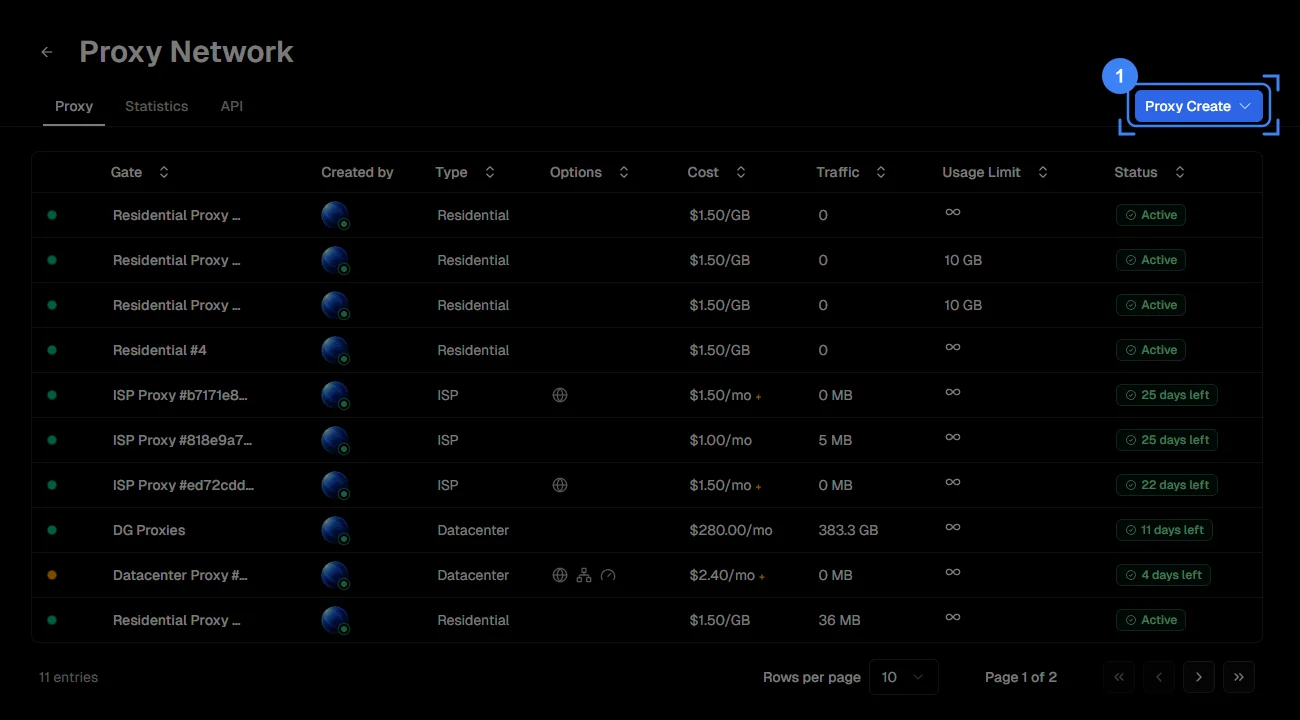
Step 1: Open the Proxy Create menu
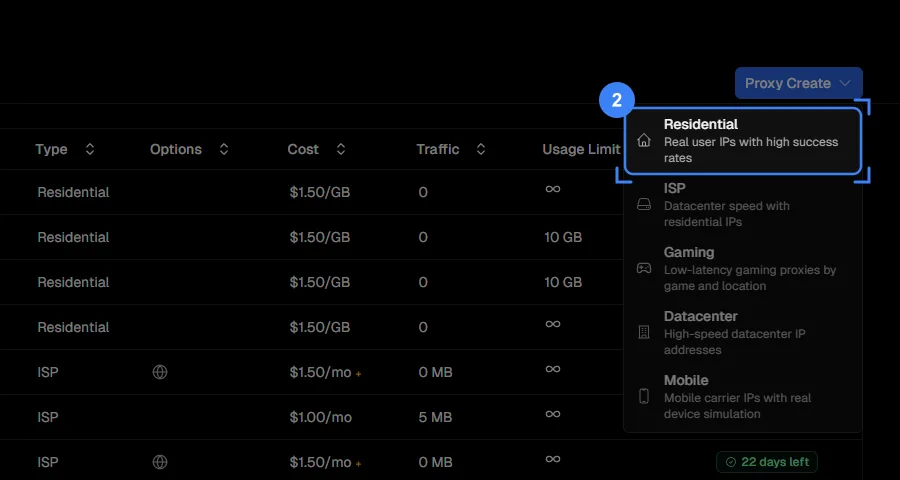
Switch to the Proxy tab. The list shows your existing gates with their name, type, cost, traffic used and status. Click the blue Proxy Create button in the top right.
Step 2: Choose the Residential type
The menu that opens lists five proxy types; click Residential at the top. The difference between the types is covered in ISP vs Residential Proxies: Which One Should You Choose?. We cover the same steps for the mobile gate in Create and Set Up a Mobile Proxy: Step-by-Step Guide and for the ISP gate with a static IP in Create and Set Up an ISP Proxy: Step-by-Step Guide.
Step 3: Name the gate and create it
On the Create Gate page the Residential tab is already selected. If you like, replace the default name in the Gate Name field with one that describes the job (for example "Price tracking TR"); you can rename it later as well. The Order Summary card on the right shows the proxy type, your account tier and the price per GB. Note the warning under the card: if you were added to a workspace as a member, the charge comes out of the account owner's balance, not yours. Tick the terms of use box and press Create.
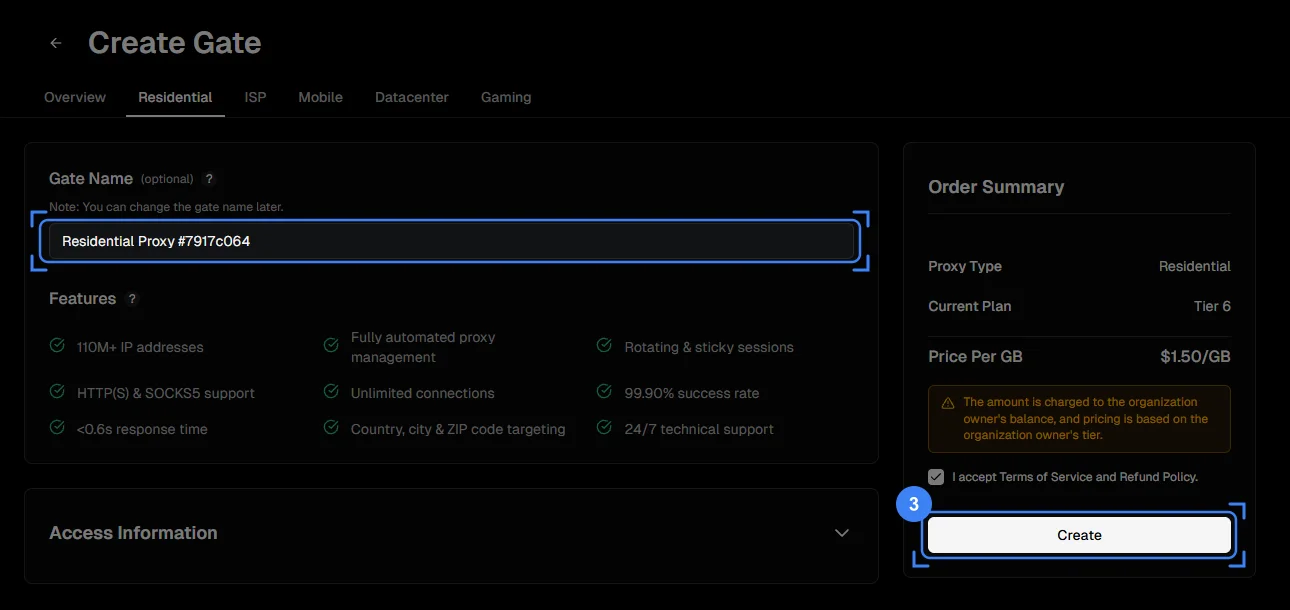
A residential gate does not expire (Duration: Lifetime). In a month where you use no traffic, you pay nothing; the gate stays in the list until you delete it.
Step 4: Get the connection details from Access Details
As soon as you press Create, the gate's page opens. It has four tabs: Access Details, Endpoint Generator, Statistics and Logs. The Access Details card on the first tab gives you everything needed to connect.
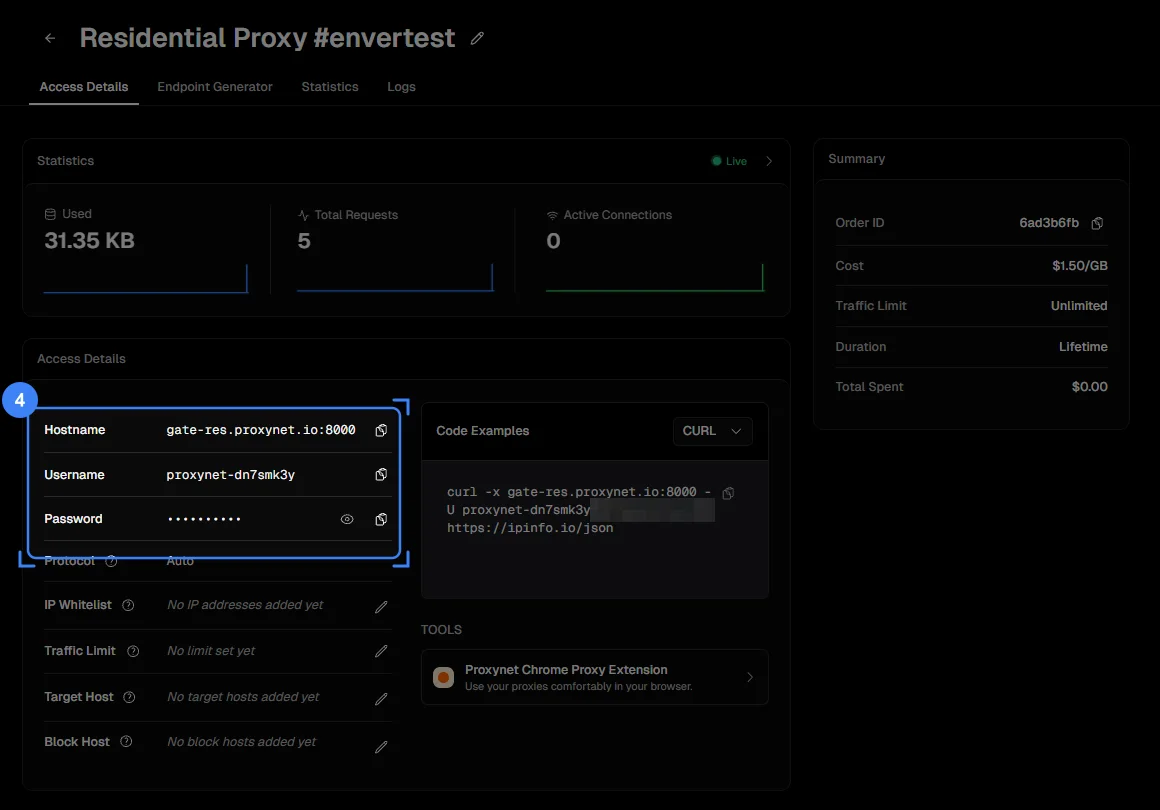
- Hostname: the gateway address and port (
gate-res.proxynet.io:8000). All residential traffic goes to this address. - Username / Password: credentials specific to this gate. The eye icon reveals the password, the copy icon puts it on the clipboard.
- Protocol: "Auto". The same port accepts both HTTP and SOCKS5 connections.
- IP Whitelist: a list of allowed IPs for devices that cannot ask for a password. Details are in Proxy Authentication: User:Pass vs IP Whitelist.
- Traffic Limit: the maximum number of GB the gate may use. Setting a cap on a trial or shared gate protects your balance.
- Target Host / Block Host: domains that are exclusively allowed or blocked. If the proxy is meant for a single site, enter that site under Target Host.
The Code Examples card on the right turns the same details into ready-made commands for curl and languages such as Python; the Tools card leads to the Chrome extension. The Summary card holds the order number, the per-GB price, the traffic limit and total spend.
Step 5: Pick a country and session in the Endpoint Generator
The details in Access Details use the gate without a country, in "global" mode. For country, city and session type, switch to the Endpoint Generator tab. Every choice is written into the username; the address and password stay the same.
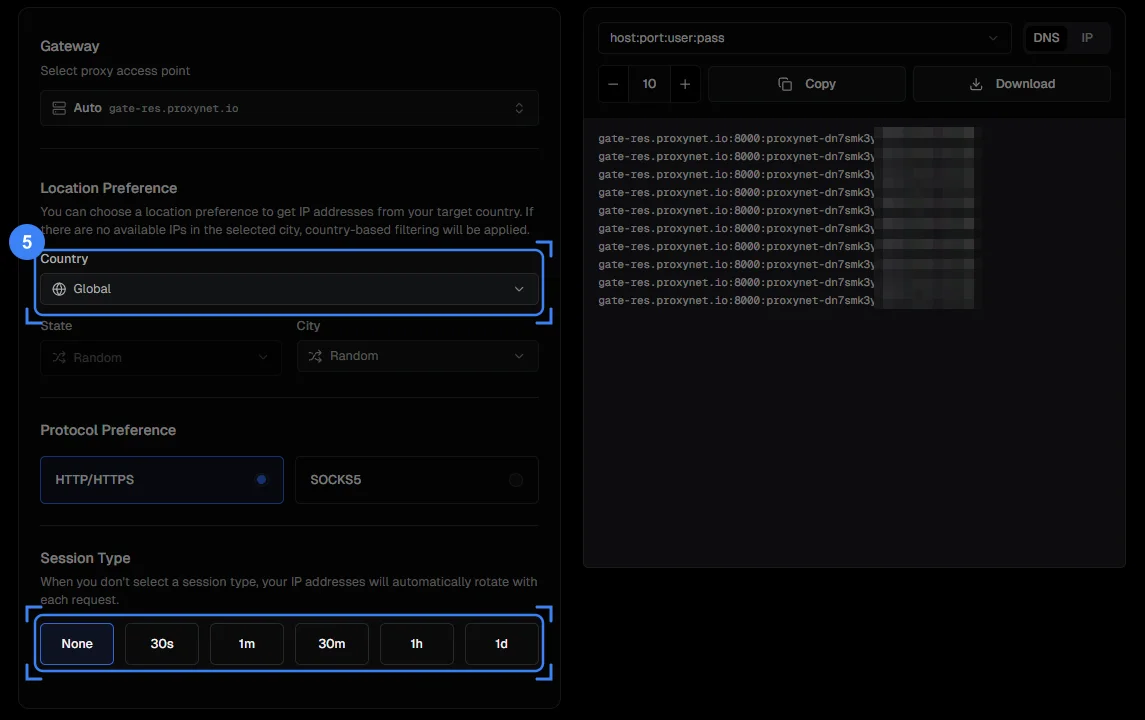
- Gateway: leave it on "Auto".
- Country: the country you want the target site to see. If left on "Global", the IP can come from any country. For Türkiye coverage, see the Türkiye proxy page.
- State / City: choose one only if the job depends on a city. If no suitable IP is available in that city at the moment, the request is served at country level.
- Protocol Preference: HTTP/HTTPS for browsers, phones and most tools; SOCKS5 for programs that require SOCKS5 or need to pass UDP (SOCKS5 Proxy).
- Session Type: None gives a new IP on every request (rotating). If you pick a duration, the same IP stays for that period (sticky); the options range from 30 seconds to 1 day. Which one to choose and when is in the table below.
The panel on the right turns your choices into a line. The host:port:user:pass format is the most common; leave the DNS / IP switch on domain; the counter sets how many lines are generated (in a sticky session, 10 lines = 10 separate IPs). Copy with Copy, or save many lines with Download. Do not type the line by hand; a single wrong character returns a 407 error. Entering the line in a browser, phone, antidetect profile or code is covered in How to Use Residential Proxies: From Panel to First Request.
How do you test a residential proxy?
Testing means opening an IP check page through the proxy and looking at the address it returns. If the visible IP is not yours but belongs to a home connection in the country you picked, the proxy is working.
Step 6: Send the first request
In the browser: install the Proxynet Chrome extension from the Tools card, enter the line you copied from the Endpoint Generator and open https://ipinfo.io/json. If the country field shows the country code you picked, the test has passed. Instead of the extension you can also use the operating system's proxy setting; the steps are in Is My Proxy Working? How to Test a Proxy.
In the terminal: the Code Examples card in Access Details gives you a curl command already filled in with the gate's details. Copy it and paste it into a terminal.
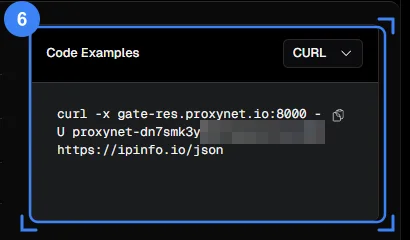
The general form of the command (the username and password are replaced with yours):
curl -x gate-res.proxynet.io:8000 -U user:pass https://ipinfo.io/json-x sets the proxy address and -U sets the proxy credentials (curl documentation). A successful test returns a response like this:
{
  "ip": "188.3.185.162",
  "city": "Istanbul",
  "region": "Istanbul",
  "country": "TR",
  "org": "AS9121 Turk Telekom"
}
Three things to check: is country the country you picked, does the org line name a home or mobile carrier, and does the IP change when you run the command twice (it should change with rotating, and stay the same with sticky until the period ends). If you get 407 instead of a response, the credentials were not accepted; the code is defined in RFC 9110, and the fix is in the error table below. If the command gets no response at all, see What Is a Proxy Error? Fix Proxy Server Not Responding; for further experiments with curl there is cURL with Proxy: How to Set HTTP and SOCKS5 Proxies.
Step 7: See the traffic in Statistics
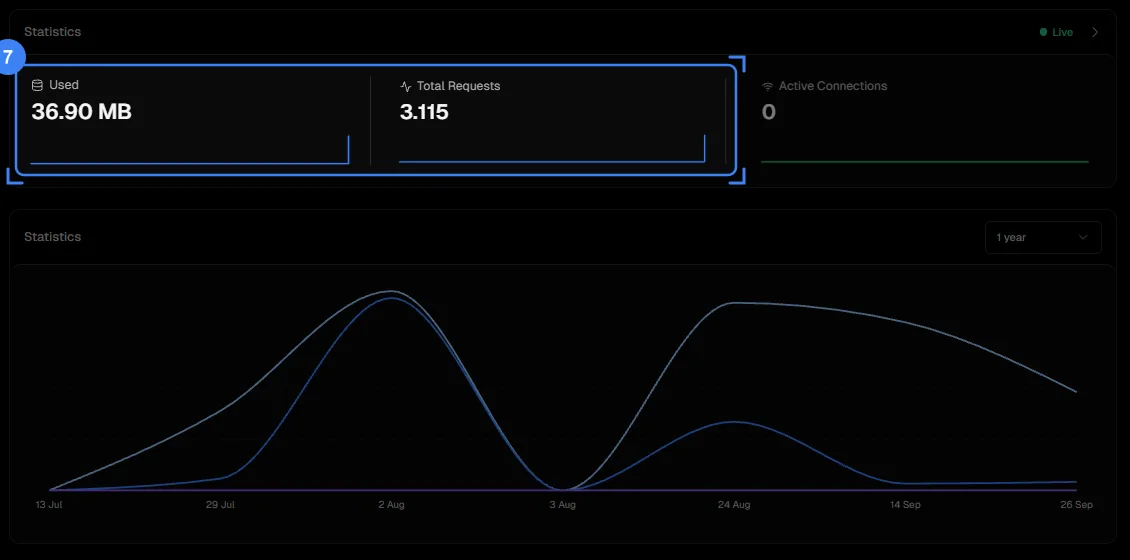
The three boxes at the top show live data: Used is total traffic spent, Total Requests the number of requests, Active Connections the number of open connections. A few seconds after the test request you will see Used grow by a few kilobytes; that is the second proof that the proxy works. The chart below shows traffic over time.
Step 8: Review requests in Logs
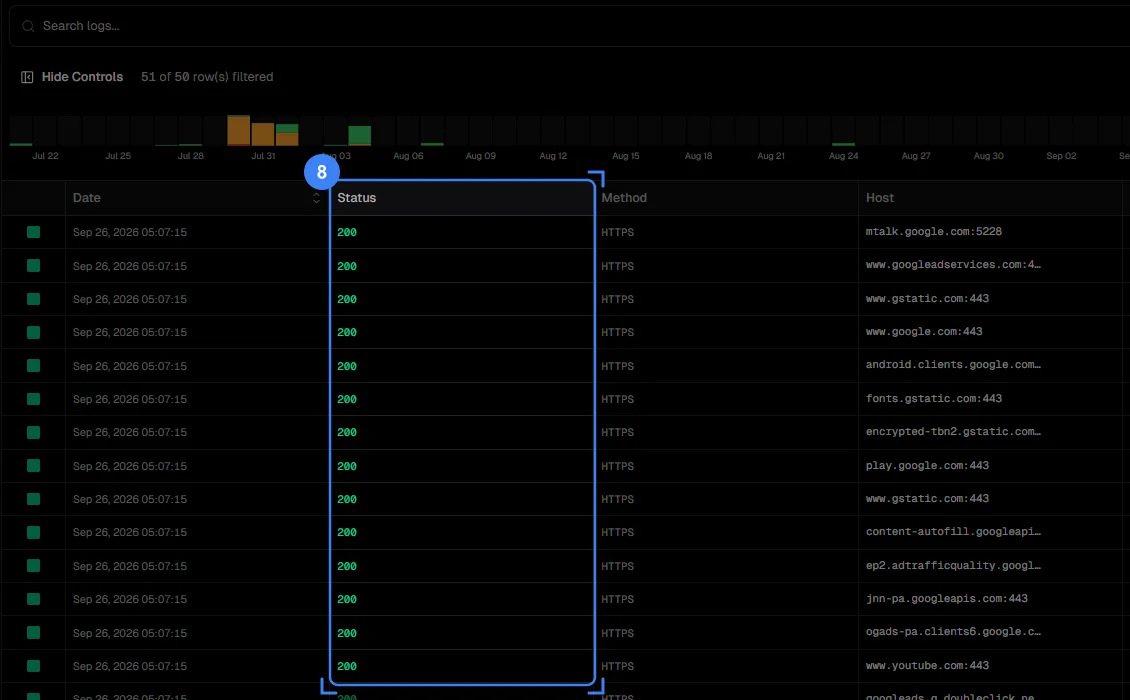
Each connection is one row: date, status code, protocol, domain, source IP and duration. The Level filter on the left separates the records: Connect for successful connections, Error for failed ones, Quota for those that hit the traffic limit, Auth for rejected credentials. When a proxy "doesn't work", this is the first place to look: no row means the request never reached the gate, an Auth row means the credentials are wrong, and a Connect row means the problem is on the target site. The Host column shows which domains are using up your GB.
That completes the setup. The sections below cover choosing a session type and the errors that come up in the first hour in more detail.
Should you use rotating or sticky sessions?
The choice in the Session Type field depends on the nature of the job. Ask yourself one question: does the site expect your requests to come from the same IP? For jobs where each request makes sense on its own, such as reading product pages, checking search results or viewing ads, it does not. For jobs such as logging in, filling a cart or submitting a multi-step form, it does, because the site ties the session cookie to your IP and sends you back to the login screen if the IP changes midway.
| Criterion | Rotating (Session Type: None) | Sticky (30 s - 1 day) |
|---|---|---|
| When does the IP change? | On every new connection | When the period ends or the IP goes offline |
| Suitable jobs | Price tracking, product list scraping, ad verification, SERP checks | Account login, cart and checkout steps, social media sessions, multi-page forms |
| Behavior when blocked | If one IP is blocked, the next request already goes out from another IP | A blocked IP stays with you until the period ends; you need to generate a new line |
| Concurrency | Unlimited connections, each with a different IP | Each line holds a separate IP; 10 lines give you 10 parallel sessions |
| GB usage | Same | Same; the price does not depend on the session type |
| Choosing a duration | None | Pick slightly longer than the job: 30m for a 5-minute login, 1d for an account that stays open all day |
| Product page | Rotating Proxy | Sticky Proxy |
Two more rules. If you chose rotating, check whether your program reuses connections: when an HTTP client keeps a connection open, the IP stays the same for that connection. If an account needs to stay on the same IP for days or weeks, use a ISP Proxy with a fixed address instead of residential; a sticky session lasts at most as long as the period you chose, and the IP changes if the home connection goes offline in the meantime. We explain why a connection stays on the same IP in What Is IP Rotation and How Does It Work?.
How do you fix common setup errors?
The table below covers nearly all the questions that come up in the first hour. Each row gives the symptom first, then what you will see in the Logs tab and what to do.
| Symptom | Seen in Logs | Cause | Fix |
|---|---|---|---|
407 Proxy Authentication Required | Auth row | Wrong username or password, or the line was truncated | Copy the line again from the Endpoint Generator; do not delete the part of the username that starts with -country-. Reveal the password with the eye icon and compare |
| Connection times out, no response at all | No row | Wrong address or port, or your network blocks port 8000 | Copy the hostname from Access Details. On a corporate network, try another network (phone hotspot); if the port is closed, ask the network admin to open port 8000 |
| You added an IP whitelist but it still asks for a password | Auth row | The IP you entered is out of date; external IPs change on home and mobile connections | Get your current external IP from an IP check page and update the list. On a device whose IP changes often, connect with username and password |
| The returned IP is not in the country you picked | Connect row | You are using the global line from Access Details, or the country code dropped out of the username | Pick the country in the Endpoint Generator, regenerate the line and copy it |
| You picked a city but the IP is from another city | Connect row | No suitable IP in that city at the moment; the panel falls back to country level | Try again in a few minutes or pick a nearby large city. If the city is essential, hold on to the right IP with a sticky session once you get it |
| You chose sticky but the IP changes on every request | Connect row | Session Type is still "None", or a new line is generated for every request | Pick a timed option and reuse the same line; if the session ID in the line changes, the IP changes too |
| Balance drained faster than expected | Unfamiliar domains in the Host column | The proxy is set system-wide; updates and cloud sync also go through it | Give the proxy only to the application that needs it. Set a Traffic Limit on the gate and, if needed, a Target Host |
Quota rows, requests rejected | Quota row | The gate's Traffic Limit has been reached | Raise or remove the limit in Access Details |
| The browser does not ask for a username and password, the page does not load | No row | The browser's own proxy setting does not support password-protected proxies | Use the Chrome extension or the operating system's proxy setting; alternatively, IP whitelist |
| A program that requires SOCKS5 does not connect | No row or Error | HTTP is selected as the protocol in the program | Select SOCKS5 in the Endpoint Generator and enter the generated line in the program's SOCKS5 field |
If none of the rows fit, check which domain the Error row in Logs points to and try opening the same address without the proxy; if the page does not load without the proxy either, the problem is not the proxy.
Decision guide
| Need | Recommendation |
|---|---|
| Create your first residential gate in the panel | Proxy > Proxy Create > Residential > Create; naming is optional |
| Exit from a specific country | Pick Country in the Endpoint Generator and regenerate the line |
| A new IP on every request | Session Type: None |
| Logged-in account, cart, form | Timed Session Type; longer than the job takes |
| The same IP for weeks | ISP Proxy |
| Test without writing code | Chrome extension + ipinfo.io/json |
| Test from the terminal | The curl command in the Code Examples card |
| A device that cannot ask for a password | IP whitelist in Access Details |
| Protect your balance | Traffic Limit on the gate, Target Host if needed |
| Diagnose "it doesn't work" | Logs tab, Level filter |
Frequently asked questions
Does it cost anything to create a residential proxy?
Creating the gate does not charge anything; you pay only for the traffic you use, per GB. The few test requests you send are measured in kilobytes. The current per-GB price appears on the Order Summary card of the order screen and on the Residential Proxy page.
Can I use more than one country with the same gate?
Yes. In the Endpoint Generator you generate a separate line for each country; the address and password stay the same, and only the username changes. You can use a Germany line in one browser profile and a Türkiye line in a script at the same time. If you want to track countries separately, you can also open separate gates; Statistics and Logs are kept per gate.
Can I rename a gate later?
Yes. On the gate page, click the pencil icon next to the title and type the new name. The name is shown only in the panel and does not affect the connection details.
Which IP should the test request show?
An IP from the country you picked, registered to a home or mobile carrier. The org line in the ipinfo.io/json response names the carrier. If you see your own IP, the request did not go through the proxy; usually the browser extension is switched off or the program was not given the proxy.
Can I see or change my password?
In the Password row of Access Details, the eye icon reveals the password and the copy icon puts it on the clipboard. If you suspect the password has leaked, the quickest route is to delete the gate and create a new one; the new gate comes with a new username and password, and your balance is not affected.
I was added to a workspace as a member. Can I create a gate?
Yes, but as the warning on the order screen says, the charge comes out of the workspace owner's balance and the price is set by their tier. The Created by column in the list shows who opened each gate.
Summary
Creating a residential proxy takes a few clicks in the panel: Proxy tab, Proxy Create, Residential, Create. The Access Details section of the gate page gives you the address, username and password; country, city and session choices are written into the username in the Endpoint Generator. To test, use the panel's curl command or the Chrome extension and check the country code and carrier on an IP check page, then watch the traffic grow in Statistics. After that, it is all in Logs: no row points to the address, Auth to the password, Connect to the target site. If you do not have a gate yet, you can start from the /proxy page.